Top ten DSLR mistake..
..from Photography blog. Just to enumerate:
- Left your kit at home.
- Not recharged the batteries.
- Set the wrong ISO speed.
- Left the lens cap on.
- Forgot to reset Exposure Compensation.
- Shot in JPEG instead of RAW.
- Chimped a prize-winning picture.
- Blurry pictures.
- Spent more on a camera body than the lens.
- Didn’t check the memory card before formatting.
A must read
A good post about randomly clicking and thinking before clicking. A must read: Is too much memory a bad thing?
ISO Speed
The ISO in ISO speed stands for International Standards Organization. In analog camera, it measures the senstivity of film to the light. If the film is more sensitive to light, the right exposure can be attained at faster shutter speed, hence it will have a faster ISO speed.
In digital camera, the ISO speed simply refers to the light senstivity of the image sensor. It is essentially the ISO equivalent of the film.
As in the case of aperture and shutter speed, the ISO speeds also follow the factor of two rule. That is if the ISO speed is doubled, say from 100 to 200, the light senstivity of the film or sensor is increased by a factor of two. The following example shows the change in exposure with change in ISO speed. The aperture and shutter speed was kept constant for all these shots at f/3.5 and 1/20 s. Note the increase in darkness/ decrease in exposure as we change the ISO speed.
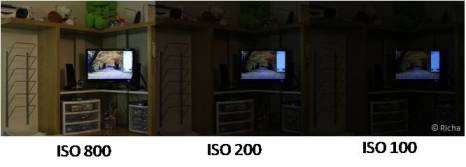
Photo 1: Change in exposure with ISO Speed.
Hence a high ISO speed is recommended when shooting in a low light condition. However, the disadvantage of shooting at high ISO speed is that an increase in noise is observed. The result of this increased noise is seen as grainy texture of the photo. The second example illustrates this point. Observe the back ground and the stem of the flower to observe the increase in grainy texture in the photo.
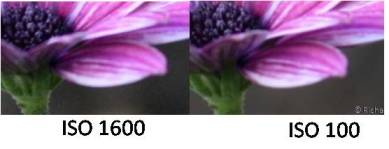
Photo 2: Change in noise with ISO Speed
Hence, there one need to consider the trade-off between right exposure and reduced noise while choosing the right ISO speed.
Most photographers (as much as I know) prefer to keep the ISO speed at ‘Auto’, hence reducing the number of parameters to be chosen at spur of moment. At the ‘Auto ISO Speed’ setting, the camera chooses the lowest ISO setting for the given light conditions. However, there are times when you might need to choose the ISO speed manually, hence it’s important to understand this trade -off.
This covers the basic of ISO speed. However, there is one other factor that gets affected by the choice of ISO speed: Depth-of-field. The DOF increases as the ISO speed increases. This is illustrated by Photo 3. Note how the lines on the wall next to the window comes in focus as the ISO speed increases.
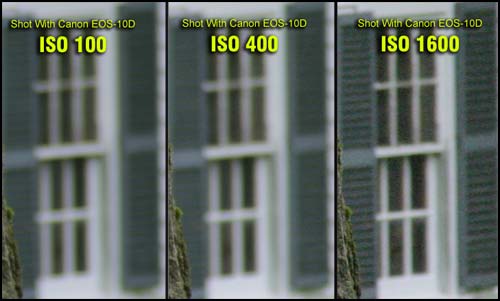
Photo 3: Change in depth-of-field with ISO Speed (Image from: Cameratown.com)
Hence there is another trade-off factor that you might want to consider. By increasing the ISO speed, you can get a greater depth-of-field and hence can compromise with noise. This becomes relevant for macro (close-up) and night photography.
Just one more thing before I sign off. As I discussed earlier, the size of image sensor varies from DSLR to DSLR. A full-frame DSLR has sensor of size 36 mm X 24 mm while all the other DSLR have sensor size smaller than that. A camera with a larger sensor, unargubly, have a larger light senstive area and hence gathers more light. So ideally, the noise levels generally decrease with larger digital camera sensor. Also the DSLR with larger sensor have small pixel size compared to DSLR with smaller sensor. Hence the noise in higher resolution becomes less enlarged so we observe less noise in the image. It’s relevance to current discussion, you ask? Well DSLR with larger image sensor can allow a higher ISO speed (and hence higher shutter speed) for same amount of noise.
This basically sums up the ISO speed. Catch you next time.
Depth of Field
Depth of field is a fairly controversial topic. I am writing this post after much research and experimentation. Here is what I understand about it:
Depth of field is the range of distance within the subject that is acceptably sharp. In simpler terms, it is the portion of a scene that appears sharp in the image. There are three main factors that control the depth of field: 1) Aperture, 2) Distance from the subject and 3) Focal Length . The last two factors are interrelated as I will explain later. Let’s discuss each of them in detail.
1) Aperture: The rule of thumb is as the aperture increases, the depth of field decreases (or become shallower).
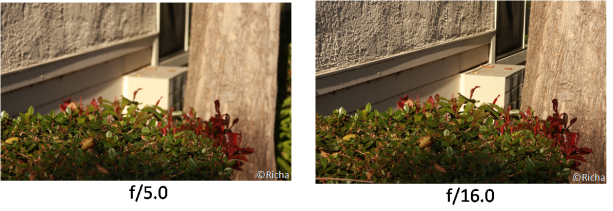
The effect of aperture on depth of field is shown in photographs below (Photo 1). The two shots were taken at same focal length (= 70mm) and subject distance. The first photograph was taken at bigger aperture (= f/5.0) than the second photograph (aperture = f/16.0). We observe a shallower depth of field in the first photograph than the second (The wall is more blurred in first shot). A cartoon showing change in the depth of field with aperture can be found here.
2) Distance from the subject: The rule of thumb is as the subject distance increases, the depth of field increases (or become deeper).
There is a simple experiment to demonstrate this effect. Hold your hand at arm’s length in front of your face. Even when you are focusing on your hand, most probably you can see the background in reasonably clear focus. Now slowly move your hand towards your face. Keep your eyes focused on the hand. Notice how the background blur increases as your hand moves towards your face. The effect can be enhanced by placing an object (like a laptop) at arm’s length right behind your hand. Moving your hand closer will slowly blur the object and hence indicating a change in depth of field.
3) Focal Length: The rule of thumb is as the focal length increases, the depth of field decreases (or become shallower). However, this is a controversial topic. Few people contest that the depth of field is independent of focal length. Let me explain this:
As I said in beginning of the post, the focal length and distance from subject are interrelated. Let me explain that first. In my earlier post I discussed about the field of view (extent of view imaged by the camera) and it’s dependence on the focal length. Basically, longer the lens, smaller the field of view. However, I didn’t mention the fact that field of view also depends upon the distance of camera from the scene or the image. Closer the camera to the scene, lesser the field of view. So effectively, you can shorten the field of view by changing the focal length (zooming in) or by moving closer to the image. Similar concept applies to the depth of field, however it is not as intuitive. The point of this discussion is that the depth of field varies with the distance from subject and this distance is related to focal length.
The controversy surrounding the dependence of focal length arises when photographers change the focal length and distance from the subject simultaneously. They are two opposing effects. Hence if you change the distance from the subject as you change the focal length, the depth of field will remain the same. For example, the depth of field of shot taken at focal length of 100mm and subject distance of 10ft will be same as the depth of field of shot taken at focal length of 75mm and subject distance of 7.5ft. You can check this result here (Depth of field for both shots will be 0.5ft for 35mm film and f/2.8 aperture).
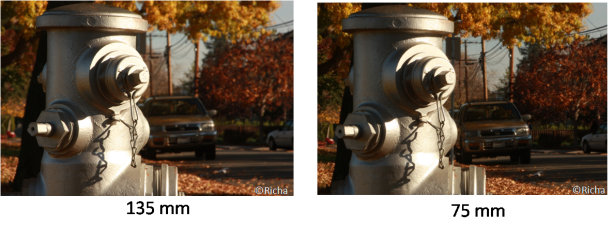
So in order to test whether the focal length affects the depth of field, we need to keep the other two factors constant. In the photographs shown below, I kept the aperture (=f/22.0) and distance from the subject constant. I took these two photographs at focal length 135mm and 75mm. I cropped the second photograph (with focal length 75mm) to keep the same field of view. The first photograph have a shallower field of depth than the second photograph (Observe the yellow leaves in the background. They are more in focus in second photograph). Hence, the focal length does affect the depth of field. And it is inversely proportional to the depth of field.
Applications
Now we know how to control the depth of field. Next question is how to apply this information, that is, when to use a shallow depth of field and when to use a deep depth of field. This is a subjective decision and hence, vary from photographer. However, there are a few rule of thumbs.
A shallow depth of field is useful for taking portraits and close-up shots of object. The distracting background is thrown out of focus to draw viewer’s attention to the main subject. Two examples of shallow depth of field are shown below (Photo 4 and Photo 5)

- Photo 3: Using shallow depth of field for close-up photography (Image from: digitalfieldguide.com)

- Photo 4: Using shallow depth of field for portrait (Image from: mir.com)
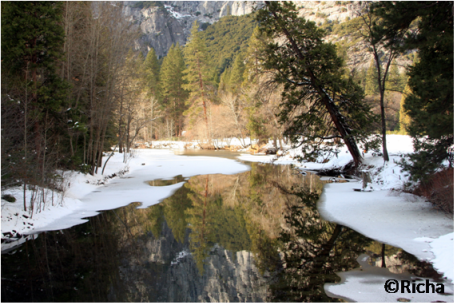
On the other hand, a deep depth of field is useful for taking landscapes and architectural photographs. It shows the details of entire scene instead of focusing at one particular object. An example is shown below:
This covers basics of the depth of field. The complete discussion of the topic will include depth of focus, circle of confusion and hyperfocal distance. However they are advance topics. I will deal with them some other time.
Tip: New DSLRs usually have a depth-of-field preview button. You can use it to preview the area of acceptable focus. It darkens the area with low focus.
The Art: Decisive moment
We have been talking a lot about the technical stuff. Let’s not forget the art part of photography. There are various reason people take photographs. Most just want to record memories. The art part of the photography doesn’t concern them much. For others it’s a medium to express themselves and their surroundings. And there are some others who just want to take beautiful pictures. The last two categories comes very close to using photography as art. Though recording memories can also turn to be very artistic like in case of Wedding photography.
I am dedicating this series “The Art” to the artistic part of photography. I will divide the post in two parts. In first part I will discuss a composition technique. In second part, I will pick a photographer and discuss few of his works.
I am starting the series with legendary French photographer Henri Cartier-Bresson (1908-2004) and his concept of decisive moment. Let’s start with the concept of decisive moment and then get introduced to HCB.
Decisive Moment:
The decisive moment is the precise moment when random actions intersect in a single instant at the right location that makes the perfect photograph. Once that moment is lost, it’s hard, if not impossible, to recreate it in exactly same location (unless of course you pay everyone to do exactly the same thing). Enough of talking, let’s see some example to make things clearer. Since Henri Cartier-Bresson (HCB) is today’s featured photographer as well as pioneer of the concept, I am giving examples from his collection.
The first picture was taken by HCB in 1932 behind Saint-Lazare Station in Paris, France. The shot was taken just a moment before the man landed in the water pool. The reflection in water pool is unspoiled. A moment later everything would be gone. A moment early will be a moment too early. The distance between the soul of the shoe and its reflection is perfect in the shot. Also pay attention to the composition of the shot. The photographer took the entire reflection of man in the frame and didn’t concentrate only on the foot. The geometrical patterns and features is a very prominent theme in HCB’s photographs. In this shot we see the railings in the background as well as reflected in the pool. However, the main subject of the photograph is out of focus. But the focus is not a big deal for this photograph. The composition and perfect timing more than make up for the focus.
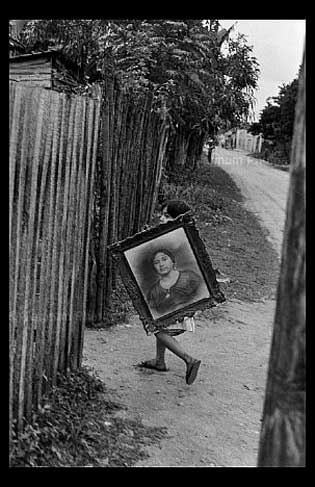
The second example is a photograph of a boy carrying a painting. This was taken by HCB in Mexico City in 1963. The geometric forms are very prominent in this shot. The fence on the right and left side of photograph forms a perfect frame. The zigzag pattern of road in the middle of the two is emphasized by the fence on the right side. Had there been no one in the picture, this shot would have looked very empty. But having this kid exactly where he is adds a new dimension to the shot. All of the sudden it’s not the picture of fence and road but of a boy carrying the picture and still none of the feature is obstructed by his presence. He is at the right position at the right time. That is the decisive moment.
Let’s now move on to the photographer of the day.
Henri Cartier-Bresson (1908-2004):
Henri Cartier-Bresson is often referred as father of modern photojournalism. He was one of the first to take 35mm film photography. He was one of the first street photographers. His claim to international fame came when he captured Gandhi’s funeral in India.
Decisive moments and geometric patterns were key features of his photographic style. Few examples:

Photo 3: Henri Cartier-Bresson, Paris, France. 1932. The Quai St Bernard, near the Gare d'Austerlitz train station.
Photo 3: Note the geometric pattern in this shot. The opening of bridge from one end of shot to the other divides the photo in three distinctive zones. Slums on the left, railroad in middle and two well dressed gentlemen on the sidewalk in the right. And the change in the area of opening in middle gives a sense that they all started at one point and were separated later on.
Photo 4: Yet another example of geometric pattern and decisive moment. Note the complex pattern of stairs and railings. They seem to compliment each other (horizontal and vertical patterns) in a unique way. The curvature of street seems to follow the curvature of railing. The only empty space in the whole frame is where the cyclist is. His placement in otherwise static frame was again a great example of decisive moment.
Photo 5: A great photojournalistic photo. The event was gold rush in Sanghai, China. As the value of the paper money sank, the Kuomintang decided to distribute 40 grams of gold per person. With the gold rush, in December, thousands came out and waited in line for hours. The police, equipped with the remnants of the armies of the International Concession, made only a gesture toward maintaining order. Ten people were crushed to death.
Photo 6: This is one of my favorite photo by HCB. Note the pattern of circular wheel being repeated by the hand of the mother and rib cage of the child. The shot captures the restlessness in India in the aftermath of partition.
HCB authored several books along the way. Few recommended ones:
- The Decisive Moment, 1952, Simon & Schuster, New York.
- The Europeans, 1955, Simon & Schuster, New York.
- China in Transition, 1956, Thames and Hudson, London.
- Tête à tête, 1998, Thames and Hudson, London.
- The Mind’s Eye, 1999, Aperture, New York.
- An Inner SIlence: The portraits of Henri Cartier-Bresson, 2006, Thames and Hudson, New York.
If you want to see more photographs by Henri Cartier-Bresson, click here.
Few of my favorite quotes/tips from HCB:
- [Photography is] the simultaneous recognition, in a fraction of a second, of the significance of an event as well as the precise organization of forms which gives that event its proper expression.
- To take a photograph is to hold one’s breath when all faculties converge in a face of fleeing reality. It is at that moment that mastering an image becomes a great physical and intellectual joy.
- [Flashes are] impolite…like coming to a concert with a pistol in your hand.
That’s it for today. Will be back with DOF photos soon.
Focal Length
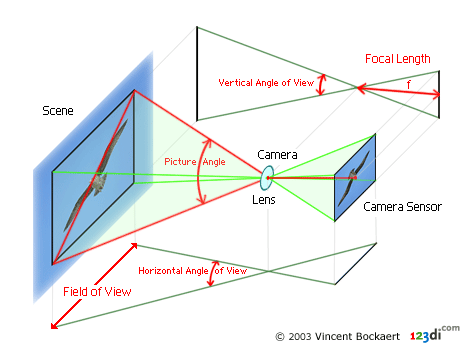
Let’s start with some definitions first. The diagram below explains various terminology that are used in photography. Let’s break it down.
Focal Length: The technical definition of focal length says it’s the distance between the optical center of lens and the focal point. The focal point of the lens is the point where all the rays parallel to the lens converge. Putting in layman language, it’s just a number they put on the lens. The bigger the number, the longer the lens (and heavier). The lenses are categorized based on it’s focal length but before we go into it, I want to define the field of view.
Field of view: Now this is an important concept as it affects the picture you are taking. The field of view describes the extent of a given scene that is imaged by a camera. It can be given as horizontal,
(Image from: http://www.dpreview.com/learn/?/key=focal+length)
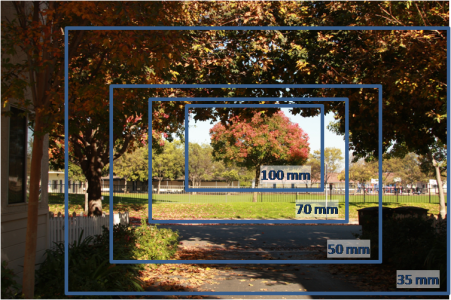
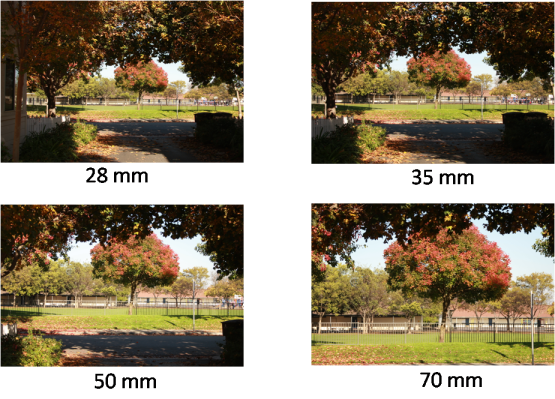
vertical or diagonal field of view. The field of view depends upon the focal length of your camera. The rule of thumb being: longer the focal length of lens, smaller is the field of view. A handy calculator to calculate the field of view for a given focal length can be found here. An example to explain the concept further:
Types of lenses:
So the field of view reduces as focal length increases. Since our field of view is restricted, as the focal length increases we can see things at distance clearly (as rest of the image is cropped) . Based on the focal length or field of view, lenses are divided in following categories:
- Less than 21 mm. Extreme wide angle. Most of the point-and-shoot cameras fall in this category. These lens are useful in taking pictures of buildings or architectural sites.
- 21-35 mm. Wide angle. Useful for taking landscapes pictures.
- 35-70 mm. Normal. Useful for taking street or documentary pictures.
- 70-135 mm. Medium Telephoto. Useful for taking portraits.
- 135-300 mm. Telephoto. Useful for taking sports, wildlife and bird shots.
- More than 300 mm. Super Telephot. Useful for shooting birds. (Bird watcher special 🙂 )
All these focal lengths are “35 mm equivalent”. If you are wondering about the term “35 mm equivalent”, you need to learn about the concept of focal length multiplier. This is a particularly important topic, if you are considering to buy a lens for your DSLR.
Focal Length Multiplier
In order to understand this concept, let’s start with the concept of image recording in DSLR. A digital camera uses sensors to record an image. It’s equivalent of film in an analog camera. So we all know (I am assuming), when the camera shutter opens, the light enters the light sensitive area of camera. This area (that contains either film or sensors) records the intensity of each component of light (Red, Green and Blue) which combine together to form the image. Now the size of this light sensitive area changes from camera to camera for DSLR.
For a 35 mm film camera this light sensitive area is 36mm X 24mm. However for DSLRs this area varies. Low-end to mid-range SLRs use sensors between 24mm X 16mm and 18mm X 14mm. Professional DSLRs use larger sensors between 29mm X 19mm and 36mm X 24mm. A DSLR with sensor 36mm X 24mm is called a full frame DSLR and the focal length for these cameras are same as for analog cameras. As far as I understand, the lenses can be interchanged between a full frame DSLR and an analog camera as they have same light sensitive areas.
Ok, so what happens when the camera has a smaller sensor? The camera can not record the entire image or the image is “cropped” compared to 35mm film. The sensor captures only the middle portion of the image recorded by a 35mm film. This phenomenon is known as “Cropped Field of View”.
A 35mm camera uses a longer lens in order to achieve the same field of view as DSLR with smaller sensor. The question is how much longer the 35 mm lens should be in order to get the same field of view as the DSLR. In other words we need a conversion factor to calculate the equivalent 35mm focal length for the lens used by a DSLR. This conversion factor is known as focal length multiplier. It is obtained as the ratio of the diagonal of 35mm film (43.3mm) divided by the diagonal of the sensor. I know it’s a bit confusing so let’s try out a little exercise.
The diagonal of a 36mm X 24mm film is 43.3mm. The diagonal of a DSLR with sensor 24mm X 16mm is 28.8mm. The focal length multiplier for the lens is 1.5x (=43.3/28.8). Hence a 17mm lens for the DSLR is equivalent to 25.5mm for 35mm camera. In other words, a 17mm lens for the DSLR will have same field of view as 25.5 mm lens for 35mm camera.
Focal Length and Depth of Field
I already covered realtion between the aperture and focal length in a previous post. In that post, I also mentioned Depth of Field (DOF) changes with aperture. However, I didn’t mention that depth of field is inversely propotional to the focal length of the lens. So the smaller the focal length the greater the depth of field. Another factor that affects the depth of field is the distance from the subject. It is directly propotional to the DOF, ie, a subject at a greater distance will have greater depth of field than a close-up subject. I will try to elaborate on these points further with some examples in next post.
Exposure
The amount of light entering the camera when you push the button is called it’s exposure. If the amount of light is more than required, the image will be over exposed. It will be more bright than the actual scene. On the other hand, if the amount of light is less than required, the image will be under exposed. It will be more dark than the actual scene.
There are two ways you can control the exposure in a DSLR: 1. by changing aperture or 2. by changing shutter speed.
1. Aperture:
Simplest way to understand is by thinking about the iris of eye. It expands when we are in a dark room and it contracts when we are in bright light. Similarly the aperture of lens can increased to let more light in or contracted to stop the light. The diagram below shows the change in aperture and relative change in size of hole opening to let the light in.
Note the text on side of each aperture settings: f/1.4, f/2 etc. they are called the F-stop numbers. They refer to the RATIO between the focal length of the lens and the aperture. Since it is a ratio, the maximum aperture attained by a lens varies. We will discuss this later. Important thing to remember here is that smaller the F-stop number the larger the aperture.
As we change the aperture from lower f-stop to next f-stop, the amount of light entering the camera doubles. So amount of light entering at f-stop f/2.8 is double than f/4 and so on.
2. Shutter Speed:
Again going by previous analouge of the way our eyes adjust to light, have you noticed when we enter a very bright place we blink a lot to compensate for that brightness. In reality we are cutting off the amount of light entering our eyes. Similarly, we can change the exposure by changing the time for which shutter of the camera will be open to let the light in.
Shutter speeds are measured in seconds and fractions of a second. Usually the f-stops for the shutter speed is given as:
- 8 seconds
- 4 seconds
- 2 seconds
- 1 second
- 1/2 second
- 1/4 second
- 1/8 second
- 1/15 second
- 1/30 second
and so on. Each of these settings is clearly half/double the length of time of its immediate neighbours. Hence yet again, each f-stop is changing in the amount of light by factor of 2.
Equivalent exposure:
As we discussed, each f-stop changes the amount of light by half or double. You can do that either by changing the aperture or shutter speed. This leads us to the idea of equivalent exposure. Let me explain this by giving you an example.
Let’s say the “correct” exposure for a particular setting is f/5.6 aperture at 1/125 second. You can get the smae exposure by increasing the aperture by one f-stop and increasing the shutter speed by one f-stop. Hence, exposure at f/5.6 aperture at 1/125 second = exposure at f/4 at 1/250 second = exposure at f/8 at 1/60 second and henceforth. These different combination of aperture and shutter speeds that give same exposure are called EQUIVALENT EXPOSURE.
So now the question is what is the advantage of changing aperture versus shutter speed.
Changing shutter speed: This is straightforward. As you decrease your shutter speed or prolong the time of exposure, it become increasingly difficult to hold the camera steady for that amount of time (time of exposure). Result: Blurry images. You can compensate a bit by changing the ISO speed to a higher speed but that tend to introduce more noise in the image. Hence it seems more advantageous to increase the aperture.
Changing Aperture: As we increase the aperture, the depth of field decreases. The depth of field (DOF) is the portion of a scene that appears sharp in the image. To see the change in DOF with increasing aperture click here.
Hence it is a trade-off between DOF and prolonged exposure. As we discussed earlier, f-stop of aperture depends on the focal length of the lens. As the focal length of the lens increases, the maximum aperture of the lens decreases. Hence, the lenses with shorter focal length are faster than the lenses with longer focal length as their maximum aperture is larger and hence their equivalent exposure can be obtained at a higher speed or lower exposure time.
Only one thing remains now. How is the exposure measured? Usually the SLRs have an in-build light meter which measures the amount of light reflected from the object of interest (shown in diagram below). Advance or professional photographers use external light meters for the same purpose. The external light meters measure the incident light and hence are more accurate.
(from: Cambridge in colour)
That’s all for today. Will be back with more.
Amateur
I am an amateur photographer. I am trying to learn a lot of things about photography. At times, I loose track of the sites that gave a great demo of some concepts. This is just my attempt to keep records straight for myself and probably compile a useful learning materials for others. Let’s see how it goes.
-
Recent
-
Links
-
Archives
- June 2009 (1)
- March 2009 (1)
- February 2009 (1)
- December 2008 (1)
- November 2008 (4)
-
Categories
-
RSS
Entries RSS
Comments RSS
